Android系统顶上的状态栏是属于FrameWork的东东,由于项目上需要对状态栏进行一些修改调整,我对其作了一个初步研究,写出来大家共享一下,其实这些早已写了,只是想等研究StatusBar中ExtendsView后再整理一个blog,不过现在已经没有时间了,目前深入研究Android Binder机制,废话不多少,开始进入statusbar的探索
1.先从StatusBar的布局文件入手,文件位置位置:frameworks/base/core/res/res/layout/status_bar.xml
2.我对status_bar.xml布局文件进行分析,画出结构图,以便对StatusBar有一个整体的了解:
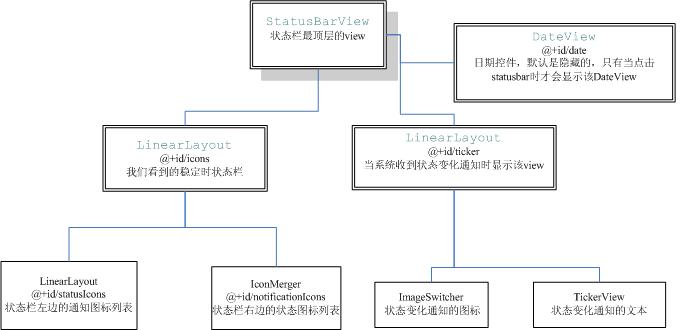
3.com.android.server.status.StatusBarView--statusbar的最顶层view,直观上我们是看不到它的
4.LinearLayout android:id="@+id/icons" 我们看到的状态栏,系统默认是左边放通知图标notificationIcons,右边放状态图标statusIcons
--1.通知图标区域:IconMerger android:id="@+id/notificationIcons"
--2.状态图标区域:LinearLayout android:id="@+id/statusIcons"
我对status_bar.xml做了修改,notificationIcons的background="#ff0000",statusIcons的background="#0000ff",下面就是现实效果

(图1)
5.那么LinearLayout android:id="@+id/ticker"显示在哪里呢,在正常情况下ticker是不显示的,只有在StatusBarService收到通知时它才显示,比如SD卡拔出时,我也截了一张图,在前面我已经修改了status_bar.xml并修改它android:background="#0000ff"大家可以看一下效果:

(图2)
6.最后一个是DateView,它是在点击statusbar时才显示的,默认是隐藏的
7.StatusBar的ui框架就这些,是不是很简单,接下来,我们肯定还有些问题:StatusBarView是如何被创建的呢?上面那个状态时钟图标如何被加载的呢?通知图标如何被加载的?下面我将继续讲解。
8.StatusBarView创建
StatusBarView是如何被创建的呢,这得从system_process说起,在system_process构建时,会运行ServerThread.run方法加载各种系统服务,其中有一个服务就是StatusBarService:

看上面调用堆栈图,StatusBarService会调用一个makeStatusBarView的方法,在里面它创建了StatusBarView
9.状态图标的加载
我们前面讲过,StatusBarView的子View LinearLayout android:id="@+id/icons"它包含一个通知图标栏,见(图1)中的红色部分,一个状态图标栏:见(图1)中的蓝色部分,但是这个并没有包含上面的图标,如时间图标(注意右边显示的时间也是一个Text类型的图标,刚开始我也不理解,在status_bar.xml中找了半天没有找到它),那么这些图标又是怎么样被加载上去的呢?还是看ServerThread.run,在ServerThread.run中调用了
com.android.server.status.StatusBarPolicy.installIcons(context, statusBar);//装载状态栏的图标
进入这个函数看它如何实现的,installIcons静态方法直接调用了构造函数StatusBarPolicy去实现这个操作了:
private StatusBarPolicy(Context context, StatusBarService service) {
// 构建设置图标...
// 注册广播接收器,接收各种图标状态变化消息,以此更新状态栏图标
}
代码太多,我就以时间图标为例,进行代码说明,代码在StatusBarPolicy构造函数中:
//构建时间图标的IconData对象,类型为TEXT
IconData mClockData = IconData.makeText("clock", "");
--IconData.makeText(String slot, CharSequence text) {
IconData data = new IconData();
data.type = TEXT;
data.slot = slot;
data.text = text;
return data;
}
//调用addIcon方法添加一个状态图标到状态栏
IBinder mClockIcon = service.addIcon(mClockData, null);
-->IBinder service.addIcon(IconData data, NotificationData n) {
int slot;
// assert early-on if they using a slot that doesn't exist.
if (data != null && n == null) {
slot = getRightIconIndex(data.slot);
if (slot < 0) {
throw new SecurityException("invalid status bar icon slot: "
+ (data.slot != null ? "'" + data.slot + "'" : "null"));
}
} else {
slot = -1;
}
IBinder key = new Binder();
addPendingOp(OP_ADD_ICON, key, data, n, -1);
return key;
}
//获取系统时间,并更新时间图标
updateClock();
-->updateClock() {
mCalendar.setTimeInMillis(System.currentTimeMillis());
mClockData.text = getSmallTime();
mService.updateIcon(mClockIcon, mClockData, null);
}
注意代码中我标注为绿色的一个StatusBarService.addPendingOp方法,它会创建一个PendingOp对象op,然后
设置op.code=OP_ADD_ICON,然后交给StatusBarService.mHandler去处理,我们根据OP_ADD_ICON搜索mHandler.handleMessage方法:
//前面函数逻辑我省略了
if (doOp) {
switch (op.code) {
case OP_ADD_ICON:
case OP_UPDATE_ICON:
performAddUpdateIcon(op.key, op.iconData, op.notificationData);
break;
根据op.code==OP_ADD_ICON,线程会调用performAddUpdateIcon方法:
void performAddUpdateIcon(IBinder key, IconData data, NotificationData n)
由于这个函数是更新状态图标和通知图标的统一入口函数,它提供了两个入口参数,IconData data, NotificationData n,当我们添加的是时间图标的时候,n==null:
void performAddUpdateIcon(IBinder key, IconData data, NotificationData n){
// n != null means to add or update notification
if (n != null) {
...
}
// to add or update icon ,this also incluce Notification icons
synchronized (mIconMap) {//mIconMap中缓存了所有显示的和不显示的通知图标和状态图标
StatusBarIcon icon = mIconMap.get(key);//first to get icon from mIconMap
if (icon == null) {//if get icon from mIconMap is null,we should to add it
// add icon
LinearLayout v = n == null ? mStatusIcons : mNotificationIcons;
//创建一个状态图标
icon = new StatusBarIcon(mContext, data, v);
mIconMap.put(key, icon);
mIconList.add(icon);//mIconList应该是显示的状态图标
if (n == null) {//n==null,说明在添加状态图标
int slotIndex = getRightIconIndex(data.slot);
StatusBarIcon[] rightIcons = mRightIcons;
if (rightIcons[slotIndex] == null) {
int pos = 0;
for (int i=mRightIcons.length-1; i>slotIndex; i--) {
StatusBarIcon ic = rightIcons[i];
if (ic != null) {
pos++;
}
}
rightIcons[slotIndex] = icon;
mStatusIcons.addView(icon.view, pos);//mStatusIcons==LinearLayout android:id="@+id/statusIcons"
} else {
Slog.e(TAG, "duplicate icon in slot " + slotIndex + "/" + data.slot);
mIconMap.remove(key);
mIconList.remove(icon);
return ;
}
} else {// is notification add notification icon
...
}
} else {//icon!=null说明是图标更新
if (n == null) {//状态图标更新
// right hand side icons -- these don't reorder
icon.update(mContext, data);
} else {//is notification to update notification icon
...
}
}
}
结合我的红色部分的注释,认真看完该函数的代码,相信你已经知道状态图标添加的详细过程。
10.通知图标的加载
我以sd卡插入状态栏通知为例进行说明。当sd 插入,代码会执行怎样的逻辑,先看一下调用堆栈:
StatusBarService.addIcon(IconData, NotificationData) line: 423
NotificationManagerService.enqueueNotificationWithTag(String, String, int, Notification, int[]) line: 745
NotificationManager.notify(String, int, Notification) line: 110
NotificationManager.notify(int, Notification) line: 90
StorageNotification.setMediaStorageNotification(int, int, int, boolean, boolean, PendingIntent) line: 478
调用进入了StatusBarService.addIcon函数,跟前面添加状态图标调用的是同一个函数,只是参数IconData==null,而NotificationData!=null。接下来执行逻辑差不多,StatusBarService.addPendingOp方法,它会创建一个PendingOp对象op,然后
设置op.code=OP_ADD_ICON,然后交给StatusBarService.mHandler去处理,根据op.code==OP_ADD_ICON,线程会调用performAddUpdateIcon方法:
void performAddUpdateIcon(IBinder key, IconData data, NotificationData n)
throws StatusBarException {
//省略无关代码
if (n != null) {
//这里我省略了一段逻辑了,是跟ExpandedView相关,当我们点击statusbar往下拖动会展开一个ExpandedView,这个以后再说
//不深入展开了,当收到一个通知,这里判断通知view列表中是否存在这个通知view,若不存在添加,若存在,更新
// 添加要显示的通知到队列中,tickerview会依次显示出来,效果如(图2)
if (n.tickerText != null && mStatusBarView.getWindowToken() != null
&& (oldData == null
|| oldData.tickerText == null
|| !CharSequences.equals(oldData.tickerText, n.tickerText))) {
if (0 == (mDisabled &
(StatusBarManager.DISABLE_NOTIFICATION_ICONS | StatusBarManager.DISABLE_NOTIFICATION_TICKER))) {
mTicker.addEntry(n, StatusBarIcon.getIcon(mContext, data), n.tickerText);//添加一个通知到tickerview
}
}
}
// to add or update icon ,this also incluce Notification icons
synchronized (mIconMap) {
StatusBarIcon icon = mIconMap.get(key);//从缓存中查看是否已存在该图标
if (icon == null) {//if get icon from mIconMap is null,we should to add it
// add
LinearLayout v = n == null ? mStatusIcons : mNotificationIcons;
icon = new StatusBarIcon(mContext, data, v);
mIconMap.put(key, icon);
mIconList.add(icon);
if (n == null) {
//状态图标处理
} else {// is notification add notification icon
//添加左边通知图标,如sd卡,usb图标等,mNotificationIcons=IconMerger android:id="@+id/notificationIcons"
int iconIndex = mNotificationData.getIconIndex(n);
mNotificationIcons.addView(icon.view, iconIndex);
}
} else {
if (n == null) {
// right hand side icons -- these don't reorder
icon.update(mContext, data);
} else {//is notification to update notification icon
//更新通知图标
// remove old
ViewGroup parent = (ViewGroup)icon.view.getParent();
parent.removeView(icon.view);
// add new
icon.update(mContext, data);
int iconIndex = mNotificationData.getIconIndex(n);
mNotificationIcons.addView(icon.view, iconIndex);
}
}
}
}
11.状态图标更新
--1.通过广播接收器的方式
当StatusBarPolicy被构建的时候,会注册一个广播消息接收器mIntentReceiver:
IntentFilter filter = new IntentFilter();
// Register for Intent broadcasts for...
filter.addAction(Intent.ACTION_TIME_TICK);
filter.addAction(Intent.ACTION_TIME_CHANGED);
......
mContext.registerReceiver(mIntentReceiver, filter, null, mHandler);
一旦接收到状态图标变化消息,就会通知StatusBarService去变更状态图标,还是以状态栏的时钟为例:
if (action.equals(Intent.ACTION_TIME_TICK)) {
updateClock();//此处接收时间变化消息
}
else if (action.equals(Intent.ACTION_TIME_CHANGED)) {
updateClock();//此处接收时间变更消息
-->updateClock()
-->StatusBarService.updateIcon(IBinder key, IconData data, NotificationData n)
-->addPendingOp(OP_UPDATE_ICON, key, data, n, -1);
}
这个跟前面添加状态图标调用是一致的,只是addIcon中addPendingOp(OP_UPDATE_ICON, key, data, n, -1);操作是 OP_UPDATE_ICON,所以,同样,
方法会执行到performAddUpdateIcon,后面逻辑见前面讲述的状态图标更新。
--2.通过远程代理方式
StatusBarManager有一个更新图标的方法: public void updateIcon(IBinder key, String slot, int iconId, int iconLevel),不过StatusBarManager并未把方法公开在sdk中,但是应该有方法可以访问的,
像launcher就有访问framework中未公开在sdk中的方法,如何实现这里我不作讨论。
//////////////////StatusBarManager.updateIcon//////////////////////////////
public void updateIcon(IBinder key, String slot, int iconId, int iconLevel) {
try {
mService.updateIcon(key, slot, mContext.getPackageName(), iconId, iconLevel);
} catch (RemoteException ex) {
// system process is dead anyway.
throw new RuntimeException(ex);
}
}
mService是StatusBarManager的一个成员变量,StatusBarManager被构建的时候被赋值,他是IStatusBar的一个代理对象
StatusBarManager(Context context) {
mContext = context;
//
mService = IStatusBar.Stub.asInterface(
ServiceManager.getService(Context.STATUS_BAR_SERVICE));
}
就这么些内容,希望对准备修改StatusBar的同仁们有所帮助!
分享到:


相关推荐
Audio框架介绍、 Audio相关服务的创建、Audio的数据流、Audio的控制流等一些内容的介绍及代码流程分析
Android Framework精编内核解析
android framework 实现细节,常见面试问题汇总
robotFramework——FOR循环语句 循环语句 robotframework⽀持FOR循环语句,语法和的语法基本相同,但robotframework中,"FOR"关键字前⾯需要增加⼀个":",写成":FOR",其它 与Python的语法相同。下⾯我们看看如何...
Android Framework精编内核解析.pdf 百度网盘永久地址
robotframework——变量⽂件 变量⽂件 何为变量⽂件? 何为变量⽂件? 变量⽂件中包含了测试数据中的变量。虽然变量可以通过变量表格中创建, 或者通过命令⾏设置, 不过这些⽅法有所局限, ⽽变量⽂件可以动态地创建...
robotframework安装_RobotFramework——基于关键字驱动的 ⾃动化测。。。 突然发现官⽅Robot Framework RIDE项⽬更新了,新的版本基于wxPython4.0.4⽀持了Python3.x,⽆疑是对于Robot Framework推 ⼴的重⼤利好(由于...
android Framework精编内核解析
This is a android framework full classes jar file
1.初探Android 2.Android开发环境搭建与编译 3.Android编译过程分析 4.android.mk初识 5.Android.mk学习1 6.Android.mk学习2 7.Android.mk学习3 8.Android启动课程大纲 9.Android启动模式 10.init启动分析 11.走入...
android framework相关面试题,详细深入的介绍了android framework相关知识点,可以很好帮助对android framework的深入理解
android framework面试题集 自己亲自总结的,各位有需要的可以随时下载
android framework 源代码
Android Framework 分析Android Framework 分析Android Framework 分析Android Framework 分析
android Framework层的修改规则,包括了编译过程和jni调用等。
android framework开发经验总结
《Android Framework 开发揭秘》,系统框架底层原理解密,腾讯技术团队最新出品!
系统包 framework.jar ,可以实现隐藏方法的调用!以前写系统应用的时候用到过,之后找不到了,备份一下以免以后丢失
自己编译的 Android12版本-framework源码jar 来源:AOSP源分支 android-12.1.0_r11
Android 13.0 framework jar 包